How to Motion Track With Text Premiere
Motion Track Effects in Premiere Pro CC 2019
![]() A powerful feature built into every effect and clip in Premiere is masks and tracking. Here's how these work.
A powerful feature built into every effect and clip in Premiere is masks and tracking. Here's how these work.
- Mask. Hides a portion of an image, using a variety of different user-defined shapes.
- Track. Moves an effect or other visual element based upon the movement of an object in the frame.
While Premiere does not support motion tracking between clips, you can use the built-in tools to track an effect within a single clips.
CREATE A MASK
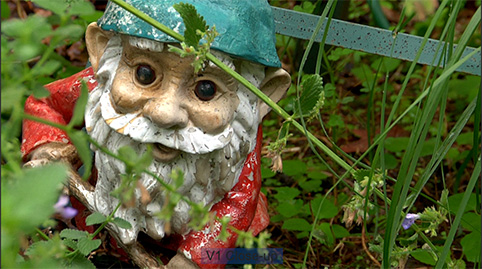
(Footage courtesy: Joe Centeno)
Let's start by blurring a face, or logo. Here, for example, is a ferocious garden gnome. Clearly, this image is too frightening for small children, we need to blur it.
NOTE: We can do this with ANY Premiere effect, blurs happen to be both easy to illustrate and popular. You could use instead, say, mosaics, tiles, or kaleidoscopes.
From the Effects panel, apply the Gaussian Blur effect by dragging it on top of the clip you want to affect.

In Effect Controls, determine the shape you want to use for the mask:
- Ellipse. This creates ovals or circles.
- Rectangle. This creates rectangles or squares.
- Free-hand. This creates arbitrary shapes with sharp corners or curves, depending upon how you drag. (We call these "Bézier curves.")
NOTE: Be sure to use the mask and controls associated with your effect. Opacity masks allow you to make portions of a clip translucent to invisible.

Here, I applied an ellipse and made the background invisible which makes the mask easier to see.
- Drag inside the circle to change its position
- Drag a square edge dot to change the size, aspect ratio, or rotation of the ellipse
- Drag the hollow dot to add feathering
- Drag the diamond dot to change where the feathering occurs
NOTE: The Bézier tool allows you to click and drag to create custom shapes and curves.

Here, I've masked the gnome's eyes and mouth. (Now you see why I made the background invisible earlier to illustrate the mask shape – it can be hard to see those blue lines.)
NOTE: To make everything blurry EXCEPT what's inside the mask, click the Invert button in the Gaussian Blur controls.

In Effect Controls, adjust the amount of Blurriness until small children are no longer terrified.

Whew!
TRACK THE MASK

At this point, the magic starts. Select the clip containing the effect you want to track, put the playhead where you want motion tracking to start and click the right-pointing arrow underneath the word "Mask" in the effect you are tracking.
Without setting any tracking points, Premiere will automatically calculate where the effect needs to move to maintain its size and position.
This is VERY cool!
NOTE: While After Effects has more flexible and powerful tracking capabilities, in many cases, simply tracking an effect is all you need and Premiere makes it easy.

Click the Wrench icon to determine what you want to adjust. By default, this track changes position, size and rotation.
EXTRA CREDIT
Try using this technique for Effects Panel > Opacity. This allows you to both mask a layer and track it at the same time. However, you can't track two separate video layers.
Bookmark the permalink.
Larry Recommends:
![]()
NEW & Updated!
Edit smarter with Larry's latest training, all available in our store.
Access over 1,900 on-demand video editing courses. Become a member of our Video Training Library today!
JOIN NOW
Subscribe to Larry's FREE weekly newsletter and save 10%
on your first purchase.
How to Motion Track With Text Premiere
Source: https://larryjordan.com/articles/effect-motion-tracking-in-premiere-pro-cc-2019/